


Have these just gone down again in price? Nice!
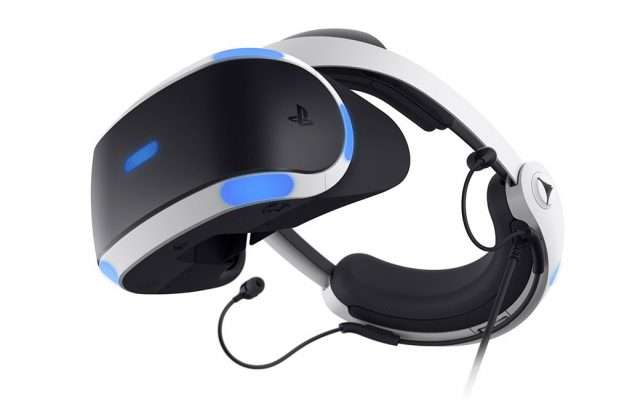
Be warned that a second hand VR headset means you'll possibly be putting someone else's old gamer gunk uncomfortably close to your face, in spite of the best refurb efforts of CEX staff.
And with games such as Dead or Alive Xtreme 3 seeing a release on this platform, you'll probably not want to play guessing games on exactly what 2nd hand dried mystery body fluids you're potentially dealing with 😷.
The CUH-ZVR2 model has less teardown info online, so I've made a guide thar collates some resources which I posted recently on another deal. Might help anyone DIY savvy that wishes to do a deep clean (near enough sterilisation and refurb) of their system, I'll paste below.
"These are grim second hand but are cleanable with some extra work. CEX themselves might not always clean the system sufficiently... mine had earwax in the earphone holders 😬, but the plastic lenses were scratch-free. Its best to buy in person if possible, especially to check condition of the lenses. But CEX have 2 year warranty (but that might go out the window if you botch the refurbishing job). These probably aren't being produced brand new anymore and the PSVR2 lacks backwards compatibility with PSVR1 so second hand is probably the only realistic option.
Took a few days of cleaning before I was happy enough to use it. Most of the time was spent finding teardown guides online as this specific model doesn't have many guides online. iFixit and YouTube seems to be flooded with the older CUH-ZVR1 model, and a lot of searches now get dilluted with PSVR2 content. Made my own written summary for refurbishing the CUH-ZVR2 with a few tips and linked resources for anyone willing to do the extra work, hopefully someone finds it useful and has a more streamlined experience than me.
I would break down the process into the following steps:
1) cleaning +/- teardown of the headset
2) cleaning the cushions
3) fitting aftermarket lens protectors
4) (optional) cleaning/refurbishing the processing unit
5) setup/calibration of the camera and headset.
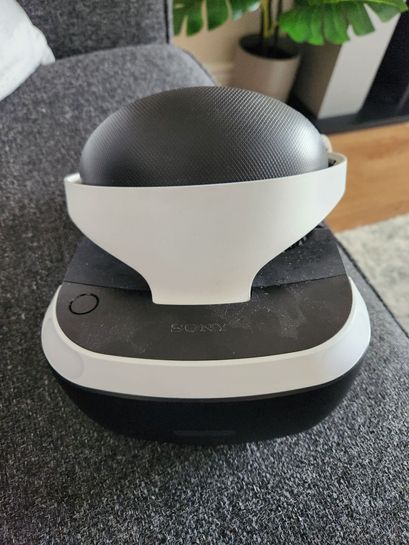
1) Cleaning +/- teardown of the headset
Ideally, you'd teardown the system (see link) and use soapy water to clean each external piece making contact with skin, etc. If not tearing down, you could simply go crazy with wet wipes and cotton buds soaked in dillute isopropyl alcohol. Don't tear down past the internal screen or lenses unless you're extremely confident you could replace without introducing dust or debris inside the viewing box. Don't apply isopropyl alcohol or any harsh cleaning agents to the plastic lenses. The silicon front light shield piece is user-removable and can be washed in soapy water. You can also buy spares online. I've got one specifically for guests.
The CUH-ZVR2 is the 2nd revision of the PS4 PSVR and has barely any teardown/modification info online. Here's the best (and possibly only?) teardown video I've seen for the headset. It's in Portugese but the visual is good, just be careful if following the parts where he removes the cushions, other videos and resources linked in this guide are slightly better.

It explains how to remove the main cable connector from the PCB for my CUH-ZVR2 headset (unscrew the metal shields first, then wedge a flathead screwdriver under the cable and pry directly upwards as far as I can tell). It also details the removal of most, if not all, of the various screws and connectors on the headset.
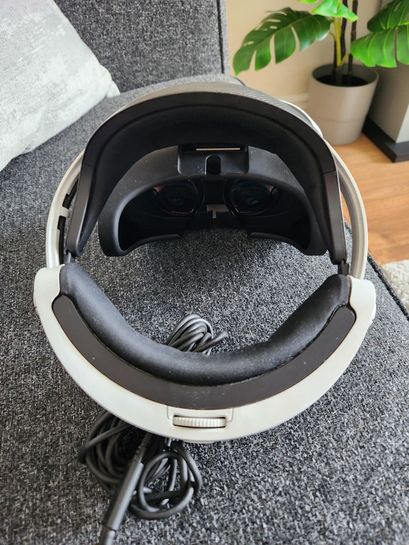
2) Cleaning the cushions
The forehead and rear cushions have a "sweat resistant" rubber lining which is extremely flimsy and most probably already peeling on most 2nd hand units that haven't been babied. It may be best peeling off all the remaining bits of rubber, otherwise they'll leave flecks of "black dandruff" over your scalp and forehead after every session. Can peel using some rubber gloves and gently massaging away the rubber bits. There's a tidy black fabric layer under the rubber. Some folk seal this with a waterproof spray (but keep in mind the front cushion firmly hugs the skin on your forehead - that skin can be fairly sensitive and sweaty, I'd still be skeptical about any "skin-safe" waterproof sprays). You could do a "dry clean" of the outside layer with soapy water and a toothbrush like I did. Just be sure to thoroughly dry everything and squeeze out as much water as possible, maybe airdry over gentle heat or in sunlight. Last thing you need is a moudly cushion sitting on your face.
To mitigate the chance of sweat seeping into the CUH-ZVR2's cushions, you could simply wear a cheap exercise sweat band and then put the VR unit on top instead. (that's what I do... sweatbands are easier to wash). Having a spare sweatbands for guests might also be a nice idea.
You don't need to remove the cushions to remove the rubber, but it helps (especially if going the soapy water route). Here's a few cleaning and teardown videos of the head straps/cushions:


youtube.com/sho…are
And here's a reddit post with a link in the comments to a decent written guide for removing the cushions, too:
reddit.com/r/P…ton
3) Fitting aftermarket lens protectors
Though PSVR is supposed to accommodate for glasses wearers, it's still possible for glass lenses from spectacles to scratch the plastic PSVR lenses.
These are aftermarket 3D printed parts from a UK eBay seller (£8, free postage for UK) which helps prevent rubbing and damage from glasses -
"Deluxe Lens Protectors for PSVR (guard glasses scratches) Playstation PS VR" 3D printed parts made and sold by jonjonjonnie on ebay:
ebay.co.uk/itm…OPY
You could probably grab similar files from Thingiverse and print them yourself as shipping could be an issue for some. This seller's version uses a harder PETG on the bottom and a rubber TPU up top, plus a thick (? 1mm ?) jelly-like adhesive tape on the bottom.
At this point you can also clean the lenses using a microfibre cloth. A dry cloth alone might work. A microfibre cloth lightly dampened with water works for stubborn dirt. You could also use lens care solution for glasses (apply onto microfibre cloth first, never directly to the PSVR lenses).
4) (Optional) cleaning/refurbishing the processor unit.
Like the headset, there isn't much online for tearing down/cleaning the CUH-ZVR2's processor box. Probably not necessary for everyone, but something to consider if the processor box ever shuts down randomly due to overheating errors. The box has one external screw (hidden behind the information sticker) but is otherwise mainly held together with clips. Be careful and take your time so as not to break any clips like me.

There's 2 rubber feet at the bottom which can be removed. Unless you're deep cleaning the processor unit, don't worry too much about removing these. They don't cover any hidden screws.
When you've removed the bottom shell, you can now access the fan which is easily removed using needle nose pliers or gently pulling. Cleaning the fan might be as far you need to go, but deeper teardown is pretty simple. Just undo every screw you see (and double-check), then the motherboard + heat sink/shield can be gently shimmied out of the plastic case at an angle.
The heat sink/shield at this point should only be held in place with the thermal pad IIRC (double check for any screws). This can be gently pried apart. Can't remember the exact thickness but you can replace or upgrade the thermal pad at this point. Remove any dust from the PCB, clean the external plastics, and then reassemble once dry. My unit is just about hanging on with one clip and a screw - I accidentally broke the other clips.
5) Setup/Calibration
There's plently of easily accessed online guides for this. The official 3-part Sony guide informs how to get started plugging everything in:

Here's a guide on extra calibration for improving accuracy and reducing blur.

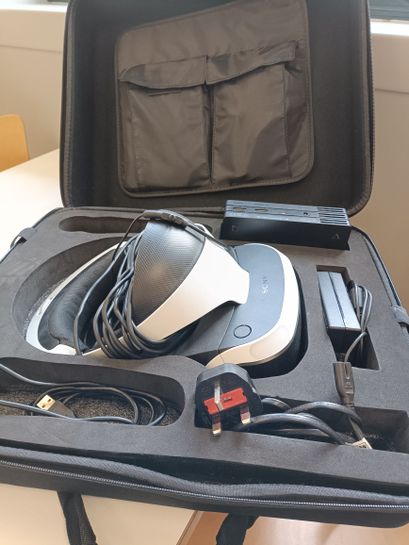
I also did a full disassembly and cleanup of my pair of PS3 move controllers. There's teardowns for this already on ifixit. I haven't done a refurbishing job to my PS4 Camera V1 but because it won't be handled as much as the controllers or headset, I wasn't too fussed about skipping this. The camera and Move controllers are beyond the scope of what I've intended to cover on this post.
Bit wordy but hopefully this guide is handy for someone looking to refurbish their unit. There is some fantastic info online about the CUH-ZVR2 but it is incredibly disjointed so I've tried collecting this together in one place. Sadly there's a possibility that some of these videos/files could end up delisted/made private, or that the eBay seller might stop making their parts."
Be warned that a second hand VR headset means you'll possibly be putting someone else's old gamer gunk uncomfortably close to your face, in spite of the best refurb efforts of CEX staff.
And with games such as Dead or Alive Xtreme 3 seeing a release on this platform, you'll probably not want to play guessing games on exactly what 2nd hand dried mystery body fluids you're potentially dealing with 😷.
The CUH-ZVR2 model has less teardown info online, so I've made a guide thar collates some resources which I posted recently on another deal. Might help anyone DIY savvy that wishes to do a deep clean (near enough sterilisation and refurb) of their system, I'll paste below.
"These are grim second hand but are cleanable with some extra work. CEX themselves might not always clean the system sufficiently... mine had earwax in the earphone holders 😬, but the plastic lenses were scratch-free. Its best to buy in person if possible, especially to check condition of the lenses. But CEX have 2 year warranty (but that might go out the window if you botch the refurbishing job). These probably aren't being produced brand new anymore and the PSVR2 lacks backwards compatibility with PSVR1 so second hand is probably the only realistic option.
Took a few days of cleaning before I was happy enough to use it. Most of the time was spent finding teardown guides online as this specific model doesn't have many guides online. iFixit and YouTube seems to be flooded with the older CUH-ZVR1 model, and a lot of searches now get dilluted with PSVR2 content. Made my own written summary for refurbishing the CUH-ZVR2 with a few tips and linked resources for anyone willing to do the extra work, hopefully someone finds it useful and has a more streamlined experience than me.
I would break down the process into the following steps:
1) cleaning +/- teardown of the headset
2) cleaning the cushions
3) fitting aftermarket lens protectors
4) (optional) cleaning/refurbishing the processing unit
5) setup/calibration of the camera and headset.
1) Cleaning +/- teardown of the headset
Ideally, you'd teardown the system (see link) and use soapy water to clean each external piece making contact with skin, etc. If not tearing down, you could simply go crazy with wet wipes and cotton buds soaked in dillute isopropyl alcohol. Don't tear down past the internal screen or lenses unless you're extremely confident you could replace without introducing dust or debris inside the viewing box. Don't apply isopropyl alcohol or any harsh cleaning agents to the plastic lenses. The silicon front light shield piece is user-removable and can be washed in soapy water. You can also buy spares online. I've got one specifically for guests.
The CUH-ZVR2 is the 2nd revision of the PS4 PSVR and has barely any teardown/modification info online. Here's the best (and possibly only?) teardown video I've seen for the headset. It's in Portugese but the visual is good, just be careful if following the parts where he removes the cushions, other videos and resources linked in this guide are slightly better.
It explains how to remove the main cable connector from the PCB for my CUH-ZVR2 headset (unscrew the metal shields first, then wedge a flathead screwdriver under the cable and pry directly upwards as far as I can tell). It also details the removal of most, if not all, of the various screws and connectors on the headset.
2) Cleaning the cushions
The forehead and rear cushions have a "sweat resistant" rubber lining which is extremely flimsy and most probably already peeling on most 2nd hand units that haven't been babied. It may be best peeling off all the remaining bits of rubber, otherwise they'll leave flecks of "black dandruff" over your scalp and forehead after every session. Can peel using some rubber gloves and gently massaging away the rubber bits. There's a tidy black fabric layer under the rubber. Some folk seal this with a waterproof spray (but keep in mind the front cushion firmly hugs the skin on your forehead - that skin can be fairly sensitive and sweaty, I'd still be skeptical about any "skin-safe" waterproof sprays). You could do a "dry clean" of the outside layer with soapy water and a toothbrush like I did. Just be sure to thoroughly dry everything and squeeze out as much water as possible, maybe airdry over gentle heat or in sunlight. Last thing you need is a moudly cushion sitting on your face.
To mitigate the chance of sweat seeping into the CUH-ZVR2's cushions, you could simply wear a cheap exercise sweat band and then put the VR unit on top instead. (that's what I do... sweatbands are easier to wash). Having a spare sweatbands for guests might also be a nice idea.
You don't need to remove the cushions to remove the rubber, but it helps (especially if going the soapy water route). Here's a few cleaning and teardown videos of the head straps/cushions:
youtube.com/sho…are
And here's a reddit post with a link in the comments to a decent written guide for removing the cushions, too:
reddit.com/r/P…ton
3) Fitting aftermarket lens protectors
Though PSVR is supposed to accommodate for glasses wearers, it's still possible for glass lenses from spectacles to scratch the plastic PSVR lenses.
These are aftermarket 3D printed parts from a UK eBay seller (£8, free postage for UK) which helps prevent rubbing and damage from glasses -
"Deluxe Lens Protectors for PSVR (guard glasses scratches) Playstation PS VR" 3D printed parts made and sold by jonjonjonnie on ebay:
ebay.co.uk/itm…OPY
You could probably grab similar files from Thingiverse and print them yourself as shipping could be an issue for some. This seller's version uses a harder PETG on the bottom and a rubber TPU up top, plus a thick (? 1mm ?) jelly-like adhesive tape on the bottom.
At this point you can also clean the lenses using a microfibre cloth. A dry cloth alone might work. A microfibre cloth lightly dampened with water works for stubborn dirt. You could also use lens care solution for glasses (apply onto microfibre cloth first, never directly to the PSVR lenses).
4) (Optional) cleaning/refurbishing the processor unit.
Like the headset, there isn't much online for tearing down/cleaning the CUH-ZVR2's processor box. Probably not necessary for everyone, but something to consider if the processor box ever shuts down randomly due to overheating errors. The box has one external screw (hidden behind the information sticker) but is otherwise mainly held together with clips. Be careful and take your time so as not to break any clips like me.
There's 2 rubber feet at the bottom which can be removed. Unless you're deep cleaning the processor unit, don't worry too much about removing these. They don't cover any hidden screws.
When you've removed the bottom shell, you can now access the fan which is easily removed using needle nose pliers or gently pulling. Cleaning the fan might be as far you need to go, but deeper teardown is pretty simple. Just undo every screw you see (and double-check), then the motherboard + heat sink/shield can be gently shimmied out of the plastic case at an angle.
The heat sink/shield at this point should only be held in place with the thermal pad IIRC (double check for any screws). This can be gently pried apart. Can't remember the exact thickness but you can replace or upgrade the thermal pad at this point. Remove any dust from the PCB, clean the external plastics, and then reassemble once dry. My unit is just about hanging on with one clip and a screw - I accidentally broke the other clips.
5) Setup/Calibration
There's plently of easily accessed online guides for this. The official 3-part Sony guide informs how to get started plugging everything in:
Here's a guide on extra calibration for improving accuracy and reducing blur.
I also did a full disassembly and cleanup of my pair of PS3 move controllers. There's teardowns for this already on ifixit. I haven't done a refurbishing job to my PS4 Camera V1 but because it won't be handled as much as the controllers or headset, I wasn't too fussed about skipping this. The camera and Move controllers are beyond the scope of what I've intended to cover on this post.
Bit wordy but hopefully this guide is handy for someone looking to refurbish their unit. There is some fantastic info online about the CUH-ZVR2 but it is incredibly disjointed so I've tried collecting this together in one place. Sadly there's a possibility that some of these videos/files could end up delisted/made private, or that the eBay seller might stop making their parts."
 Seems I've got lucky at redcar store!
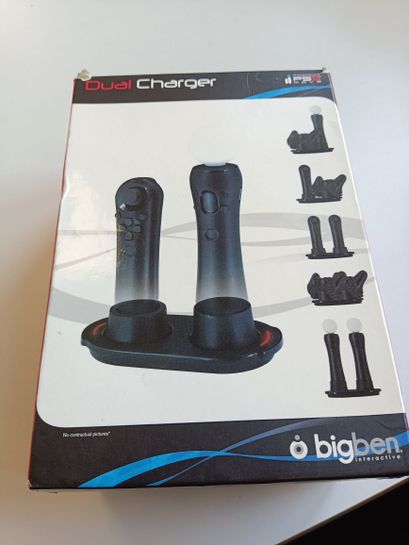 I also asked about a ps3 move controller charging dock. This is a value double dock for £3..... It comes with interchangeable bases you can charge ps3 & nav controllers as well.
This has been asked a lot in this thread so adding here for clarity.
A word of warning that if you need to use this on a PS5 you need the adapter. It's free to claim but if the previous owner has claimed it, you won't be able to as it's one claim per serial number.
camera-adaptor.support.playstation.com/en-gb
Otherwise you'll need to buy one, e.g. from CeX themselves:
uk.webuy.com/pro…a01